STARION D2 COILOVERS - GROUP BUY - A$1,220 landed
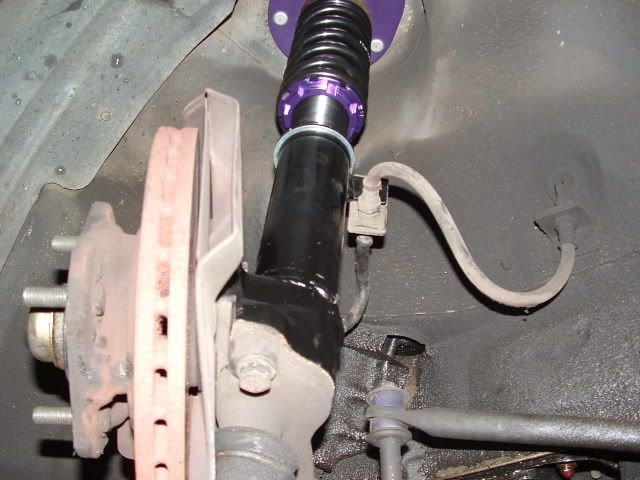
that looks quite low, John...might have to lip the guards before they bite...
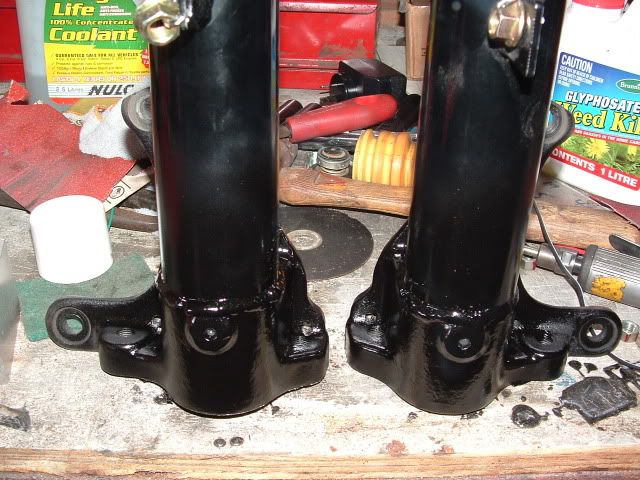
Nice work on the pics. Did you paint the welds and bottom of the struts?
How do they feel on the road?
Nice work on the pics. Did you paint the welds and bottom of the struts?
How do they feel on the road?
Please register your vehicle details on the AUSTRALIAN STARION REGISTRY <HERE>
1 x 3.2T
1 x 2.8T
3 x 2.6T's
1 x 2.0T
1 x 3.2T
1 x 2.8T
3 x 2.6T's
1 x 2.0T
-
John196701
- I like starions
- Posts: 108
- Joined: Fri Jun 18, 2010 9:36 pm
- Location: Camden
the guards have been rolled, yes the pictures where taken before i painted them.


the ride is good, a bit firmer, the steering is a better, turns into corners well.


the ride is good, a bit firmer, the steering is a better, turns into corners well.
Last edited by John196701 on Tue Jan 11, 2011 6:09 pm, edited 1 time in total.

JB Starion Black, owned since 1988
JB Starion Black, track car build
is that the highest ride height you can get from adjustment or you just want it that low?
quest wrote:don't try explaining that to her tho..... just leave. lolWANTSOM wrote:Personally, I find sloppy boxes very unsatisfying. I like them tight and taught to the point that if you dont have to push to get it in then its probably too old and time to get a new one :P
-
John196701
- I like starions
- Posts: 108
- Joined: Fri Jun 18, 2010 9:36 pm
- Location: Camden
-
John196701
- I like starions
- Posts: 108
- Joined: Fri Jun 18, 2010 9:36 pm
- Location: Camden
For anyone else that wants to buy coilovers that missed out on the group buy like me, i bought my set from Joe from JM Auto Racing, they post on there website $965us, if you ask from a discount he will bring them down to $925us, the freight was $350, there is no import duty or sales tax to be paid because it is under $1000aud, i found him very helpful.
It works out at a little more than the group buy, but not much
http://www.jmautoracing.com/
It works out at a little more than the group buy, but not much
http://www.jmautoracing.com/

JB Starion Black, owned since 1988
JB Starion Black, track car build
that's really not that bad at all.. hey Pete, how much tax did we end up paying on each set in the group buy?
i'd happily pay more to the people that are supplying us with these parts than the government that strives to make it harder and harder for us to keep our cars on the road.
i'd happily pay more to the people that are supplying us with these parts than the government that strives to make it harder and harder for us to keep our cars on the road.
quest wrote:don't try explaining that to her tho..... just leave. lolWANTSOM wrote:Personally, I find sloppy boxes very unsatisfying. I like them tight and taught to the point that if you dont have to push to get it in then its probably too old and time to get a new one :P
Sandblasted & cut stubs. I cut these at 30mm as described on the instructions, but I think you can get away with at least double this unless you are going rediculously low. Note the small hole for a plug weld.

Press the two together. No need to sand the tube as shown on a SQ thread.

tig welded together. I also welded the OEM brake hose bracket on because I had to paint the lot anyway.

Old vs new. My old setup in rear uses shocks that are way too long. This will be retified if I revert back to the old.


I'm not sure if it goes low enough?


Tomorrow's task it to get it to a usable height, then I will measure the collet heights so others will have some idea where to start.
For those new to removing the rear suspension it can be a bit tricky if you don't know how. Set up a puller bar like this and the struts come out easy-as. Beats the banging and swearing that I used to do.


Press the two together. No need to sand the tube as shown on a SQ thread.

tig welded together. I also welded the OEM brake hose bracket on because I had to paint the lot anyway.

Old vs new. My old setup in rear uses shocks that are way too long. This will be retified if I revert back to the old.


I'm not sure if it goes low enough?


Tomorrow's task it to get it to a usable height, then I will measure the collet heights so others will have some idea where to start.
For those new to removing the rear suspension it can be a bit tricky if you don't know how. Set up a puller bar like this and the struts come out easy-as. Beats the banging and swearing that I used to do.

4G63 - 87kg
4G54 - 107kg
4G54 - 107kg
-
redzone
- racking my brains
- Posts: 5900
- Joined: Thu Oct 06, 2005 10:46 pm
- Location: sunshine coast qld
- Contact:
nicely done mate!
Fibreglass airdams $370, fibreglass front bumpers $260, reco drag links $165, alloy radiators $925 (unpolished), h/l switch rebuilds $125, all plus freight.
Coxs Automotive (07)54433507 3/5 Service st Maroochydore Q
www.facebook.com/coxsautomotive
www.coxsautomotive.com.au
Coxs Automotive (07)54433507 3/5 Service st Maroochydore Q
www.facebook.com/coxsautomotive
www.coxsautomotive.com.au
Nice pics MrBishi, looks like they go more than low enough for me and you've done a nice clean fab job.
After all the previous discussion about welding position you seem to have knocked the legs all the way down onto the cast knuckle then welded to it??? If the leg was raised off the knuckle then welded to the original leg as was previously proposed in this thread, surely the whole weight of the vehicle and road shocks/bumps would be acting on that single weld???
The original leg is welded to the knuckle from underneath for those that aren't aware.
I would also like to hear from those with them fitted any on road review of the supplied spring rates.
jb - white outside maroon inside
The weld is not doing much of the 'work'. Remember that the tubes are press fit and neither is going to bend. The longer the overlap of tubes the better for strength. Conversely making the original tube too long will restrict the operating range of the coil overs.
FWIW I can't even get out my driveway with the car set to the height pictured above.
FWIW I can't even get out my driveway with the car set to the height pictured above.
4G63 - 87kg
4G54 - 107kg
4G54 - 107kg
Before I rant on here, I want to say Mrbishi that the way it looks like you've fab'd these is exactly as I think it should be done. :) (but I'm prepared to be proven wrong by others with more knowledge)
I'm not talking about the joined legs "bending", with the correct overlap and a good weld I wouldn't think that at all possible.
As far as I can tell the biggest concern with people was whether the new leg could be welded directly to the cast knuckle or not.
Both you and Dave clearly said that it wouldn't be welded to the cast section but to the original tube.
The point I was making/proposing is that if the new leg is welded directly to the original leg, above the knuckle (no weld on the knuckle as you guys talked about) the cars weight would be held by this weld (ie doing alot of work), despite the fact that they are "pressed" together.
The starquest thread shows the leg being knocked down with a block of wood and hammer, so I don't think there's that much friction the cars weight couldn't stress that weld during actual use.
As you have shown in your photos, I think the leg should be pressed down flush with the knuckle and welded to the knuckle. Forces up and down the leg then wouldn't be solely resisted by the weld and tube in tube "friction".
I'm not trying to be a smartarse here, just wanted to thrash out the concepts involved and clarify previous discussions in this thread for the sake of noobs like me and as a future reference for other noobs looking at doing this work.
Can't wait to get these on my car. :) Yours is quite the inspiration.
From this comment I don't think you understand what I was enquiring about.MrBishi wrote: The weld is not doing much of the 'work'. Remember that the tubes are press fit and neither is going to bend.
I'm not talking about the joined legs "bending", with the correct overlap and a good weld I wouldn't think that at all possible.
As far as I can tell the biggest concern with people was whether the new leg could be welded directly to the cast knuckle or not.
Both you and Dave clearly said that it wouldn't be welded to the cast section but to the original tube.
The point I was making/proposing is that if the new leg is welded directly to the original leg, above the knuckle (no weld on the knuckle as you guys talked about) the cars weight would be held by this weld (ie doing alot of work), despite the fact that they are "pressed" together.
The starquest thread shows the leg being knocked down with a block of wood and hammer, so I don't think there's that much friction the cars weight couldn't stress that weld during actual use.
As you have shown in your photos, I think the leg should be pressed down flush with the knuckle and welded to the knuckle. Forces up and down the leg then wouldn't be solely resisted by the weld and tube in tube "friction".
I'm not trying to be a smartarse here, just wanted to thrash out the concepts involved and clarify previous discussions in this thread for the sake of noobs like me and as a future reference for other noobs looking at doing this work.
Can't wait to get these on my car. :) Yours is quite the inspiration.
jb - white outside maroon inside
Don't everyone answer all at once... :D
Well after some phone support (Shannon/Dave) these are the setting I'm using on the rears...
REAR SETTINGS...
Spring height = 205mm (5mm of preload on the Spring)
Bottom of Spring Perch Locking Nut to Bottom of Bottom Height Nut = 50mm
(OVERALL LENGTH: Top of top mount plate to bottom of bottom bolt-in flange = 475mm)
Running a 255/40/17 Tyre on 17x9 +15 Rim
Ground to Guard = 605mm. It's not slammed, but looks neat. There is some camber in the rear. Will get it checked to see how much...
About 10mm of clearance of tyre/rim to the coilover spring/nuts...
Just a cruise around the block and the rear did feel nice and firm I was expecting it to be harder. Once the fronts are in and some more Km's it will be great.
1985 JB Starion #157
Front:
178mm spring height (just captive)
75mm between bottom spring nut (purple) and strut tube nut (black)
Rear:
205mm spring
50mm between
This is at a driveable height now, but still low. Will drive and take a pic soon.
Use these dimensions to work out how long to cut your strut tubes. Mock up the heights above and measure how far up the tube the cut strut can fit. The longer the better IMHO.
4G63 - 87kg
4G54 - 107kg
4G54 - 107kg
Who is online
Users browsing this forum: No registered users and 2 guests