Schultz JB Starion

Another update
Thank you "redzone"
Thank you "TOMSUN"
I hate the smell of fish oil but yes I thought I better get a can of it because I would like to keep the car for a few more years if possible. I suppose that depends on the new "HOON LAWS" up here, lol.
Thank you "enthuzed"
I am getting there slowly. I have been working on the sill panels and thought I might drill a few holes in them as well to let all that nasty water out that makes my poor little car rust.
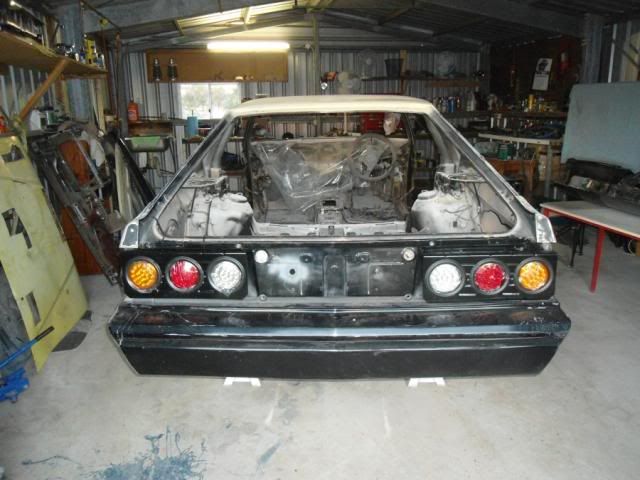
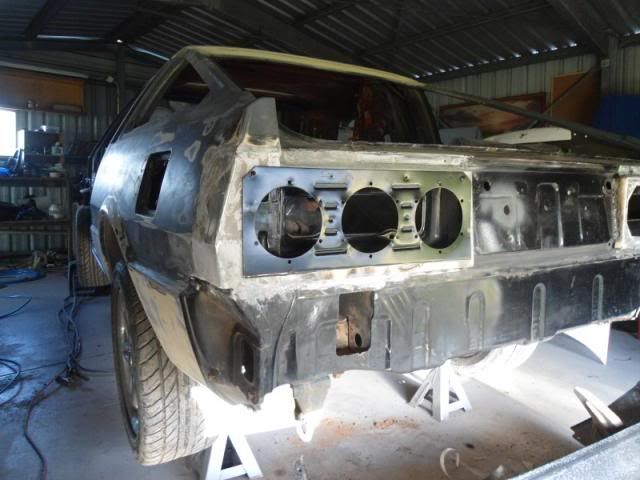
Now, for something totally different, of sorts. I got my LED lights today and just tied them on the back and added the bumper so see what it would look like.
I like it.
Thank you "TOMSUN"
I hate the smell of fish oil but yes I thought I better get a can of it because I would like to keep the car for a few more years if possible. I suppose that depends on the new "HOON LAWS" up here, lol.
Thank you "enthuzed"
I am getting there slowly. I have been working on the sill panels and thought I might drill a few holes in them as well to let all that nasty water out that makes my poor little car rust.
Now, for something totally different, of sorts. I got my LED lights today and just tied them on the back and added the bumper so see what it would look like.
I like it.
Re: Another update
WTF???
Have you been saving up pix for a year, andt hen posting?
Or are you unimployed?
LOL
Good work and I admire the pace... !!! :beer
Wish I had the time.... and space...
Have you been saving up pix for a year, andt hen posting?
Or are you unimployed?
LOL
Good work and I admire the pace... !!! :beer
Wish I had the time.... and space...
I don't... yet, anyway... but let's see.Schultz wrote: I got my LED lights today and just tied them on the back and added the bumper so see what it would look like.
I like it.
G'day fugazi
roflWTF???
Have you been saving up pix for a year, and then posting?
Or are you unemployed?
I am unemployed which means I am always broke and have heaps of time. I only started work on it about middle of March but with me being in the shed for about 6 to 14 hours a day working on the car I am getting it done.
I still have to build all new steel to replace where the standard lights go at the moment and then cut some rectangular holes in it to bolt my LED's into it. A lot of work involved in doing that but I never done anything like it and I just want to give it a go. If I can't do it I just cut it all off again and then put the standard lights in.
-
enthuzed
- Austarion Occupant
- Posts: 3578
- Joined: Tue Apr 06, 2004 1:21 pm
- Location: Melborno
- Contact:
Surprisingly that looks alright! :o
As for the fishoil there is low/no odor stuff you can buy. Even with the stinky stuff the smell goes in a few days so in your case you'll not smell it in the car at all!
As for the fishoil there is low/no odor stuff you can buy. Even with the stinky stuff the smell goes in a few days so in your case you'll not smell it in the car at all!
Reduce fuel costs by 15-20% & cut emissions by 1/3rd...
Increase engine performance & prolong engine life...
How?
Click the website button below & watch the 3 minute video.
Increase engine performance & prolong engine life...
How?
Click the website button below & watch the 3 minute video.
-
redzone
- racking my brains
- Posts: 5900
- Joined: Thu Oct 06, 2005 10:46 pm
- Location: sunshine coast qld
- Contact:
I could probably give u some ja light housings to cut up & blend the led lights into so you could do it in plastic rather than weld metal onto the car? That way you could just bolt them in like standard.
Fibreglass airdams $370, fibreglass front bumpers $260, reco drag links $165, alloy radiators $925 (unpolished), h/l switch rebuilds $125, all plus freight.
Coxs Automotive (07)54433507 3/5 Service st Maroochydore Q
www.facebook.com/coxsautomotive
www.coxsautomotive.com.au
Coxs Automotive (07)54433507 3/5 Service st Maroochydore Q
www.facebook.com/coxsautomotive
www.coxsautomotive.com.au
Thank you "redzone"
I appreciate the offer.
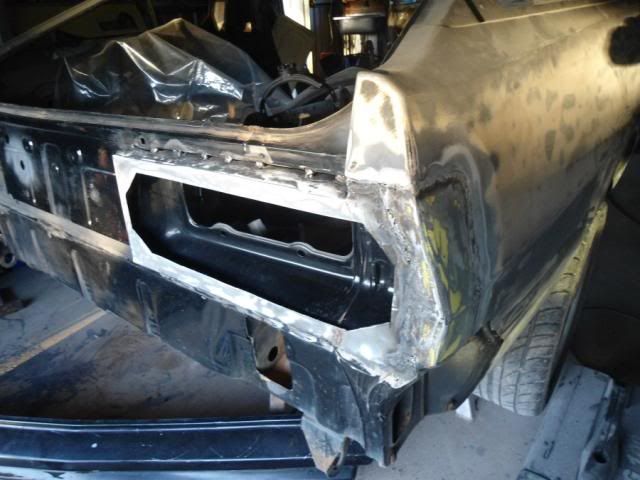
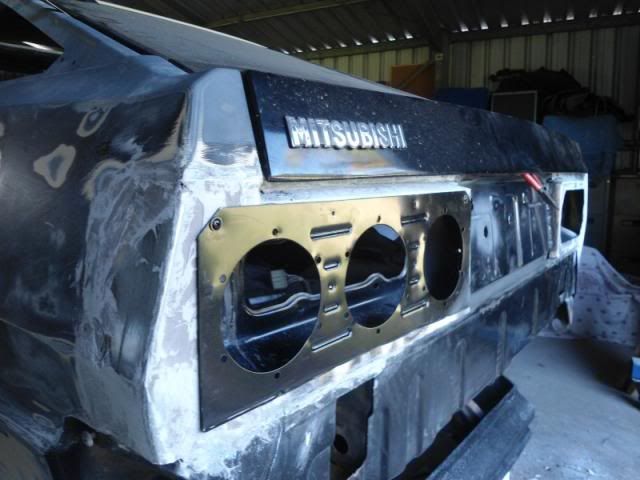
I had a look at how to do that using the plastic base from the lights instead of metal and I must say that might be a little bit beyond what I am capable of. With steel I have an idea in my head on how to do it, I made up a cardboard cutout of the shape I need and then I cut it out of sheet metal and then glue it on, seems simple to me.
After I make it, I just cut a rectangular hole in it for to bolt the lights on. I thought at first I would weld the whole steel bracket in but then it occurred to me that if something went wrong with the lights I would have a problem fixing them.
I appreciate the offer.
I had a look at how to do that using the plastic base from the lights instead of metal and I must say that might be a little bit beyond what I am capable of. With steel I have an idea in my head on how to do it, I made up a cardboard cutout of the shape I need and then I cut it out of sheet metal and then glue it on, seems simple to me.
After I make it, I just cut a rectangular hole in it for to bolt the lights on. I thought at first I would weld the whole steel bracket in but then it occurred to me that if something went wrong with the lights I would have a problem fixing them.
Time for another update
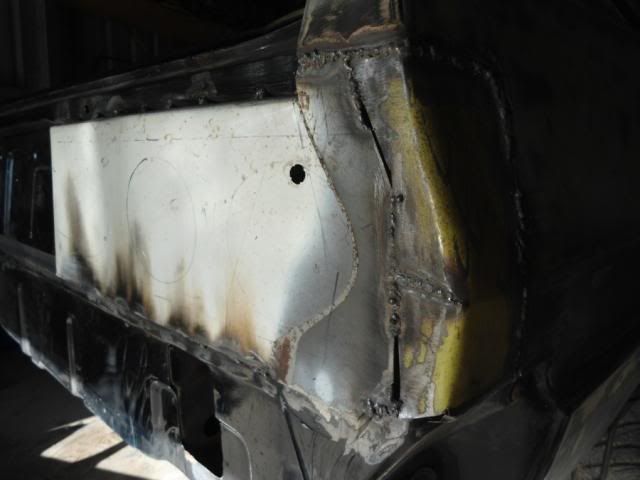
G'day everyone. Have fixed the rust in the sills and started work on my tail light housings.

Thank you jk
I am enjoying myself greatly and probably will be a bit sad when I have completed all the work on it. But am already thinking about a couple of other things for me to do.
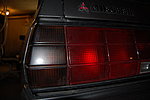
That's what it should look like when the lights are on it.
That's what it should look like when the lights are on it.

Re: Thank you jk
lucky for you my friend, the work on a starion is never ever completeSchultz wrote:probably will be a bit sad when I have completed all the work on it.
quest wrote:don't try explaining that to her tho..... just leave. lolWANTSOM wrote:Personally, I find sloppy boxes very unsatisfying. I like them tight and taught to the point that if you dont have to push to get it in then its probably too old and time to get a new one :P
G'day thrash
I know what you mean there with never ending the repairs on a Starion. When I was lying under the rear end I noticed that I will have to replace the bushes all around the back, they look like half of them slipped a bit. But that will have to wait for another time because got too much on my plate right now with what I am doing.
G'day kailo
I will fit the hatch tomorrow and have a look at the gap. My measurements were for 2 cm across the top but now that you point it out 2 cm might be a bit too much. Will let you know when I fitted the hatch with a picture.
A picture of the hatch on the car
I had a look at what it will look like with the hatch on the car and I think I will leave the gap as it is for now as I am not following the original lines of the hatch. My creation is a bit flatter then the point sticking out in the middle on the hatch.
Sounds crazy but it looks alright to me. :)
Who is online
Users browsing this forum: No registered users and 2 guests