Als POS

Display your ride and post power figures, dyno runs, drag and circuit times.
User avatar
Alspos
Flucking kwankers
Posts: 4107
Joined: Thu Jan 08, 2004 2:09 pm
Location: Melbourne
Contact:

Post by Alspos »

Well....it's registered and I drove it to work! Woo hoo!

Image

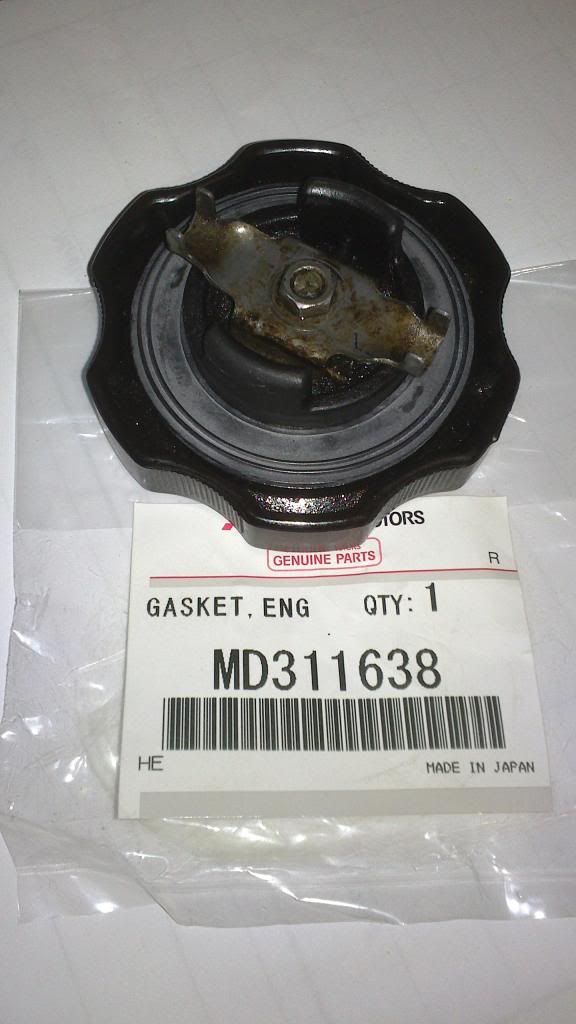
Also solved oil leak from the oil filler cap. New rubber gasket. the old one was like bakelite! $4.40 from Mitsubishi. Part No. MD311638

Image
OLD FART
Austarion Occupant
Posts: 3448
Joined: Sun Jun 19, 2005 1:34 pm
Location: Brisbane

Post by OLD FART »

Al you will have to change your nom de plume seeing your JA is no longer a POS :beer :D
I've had mine since 03 07 92
85 JB 2323cc DOHC 4G63
THE OLDER I GET THE FASTER I WAS
GROWING OLD IS MANDATORY GROWING UP IS OPTIONAL
User avatar
Alspos
Flucking kwankers
Posts: 4107
Joined: Thu Jan 08, 2004 2:09 pm
Location: Melbourne
Contact:

Post by Alspos »

OLD FART wrote:Al you will have to change your nom de plume seeing your JA is no longer a POS :beer :D
Hehehe....it still has it's moments though....it's not perfect yet.
User avatar
thrash
Austarion Occupant
Posts: 3028
Joined: Mon Apr 02, 2007 10:09 pm
Location: Sydney, Australia

Post by thrash »

perfection is a figment of our imagination
quest wrote:
WANTSOM wrote:Personally, I find sloppy boxes very unsatisfying. I like them tight and taught to the point that if you dont have to push to get it in then its probably too old and time to get a new one :P
don't try explaining that to her tho..... just leave. lol
User avatar
DrDeath
I like starions
Posts: 108
Joined: Sat Sep 30, 2006 1:03 pm
Location: Sunshine Coast
Contact:

Post by DrDeath »

registered without mud flaps? They are getting lax at the transport department.
User avatar
Alspos
Flucking kwankers
Posts: 4107
Joined: Thu Jan 08, 2004 2:09 pm
Location: Melbourne
Contact:

Post by Alspos »

They'd have to actually see it to pick on it.

And really, no mudflaps will get you in trouble? How ridiculous is that! Motorbike riders should just ride when it's dry :P
User avatar
DrDeath
I like starions
Posts: 108
Joined: Sat Sep 30, 2006 1:03 pm
Location: Sunshine Coast
Contact:

Post by DrDeath »

Yea. QLD rules are just getting worse
kailo
Dorifto!
Posts: 51
Joined: Sat Dec 11, 2010 1:52 pm
Location: Brisbane

Post by kailo »

really? mine passed rwc with no flaps for mud
User avatar
thrash
Austarion Occupant
Posts: 3028
Joined: Mon Apr 02, 2007 10:09 pm
Location: Sydney, Australia

Post by thrash »

new cars don't have mud flaps...??

if the inspector person is under 30, he probably doesn't even know what mud flaps are rofl
quest wrote:
WANTSOM wrote:Personally, I find sloppy boxes very unsatisfying. I like them tight and taught to the point that if you dont have to push to get it in then its probably too old and time to get a new one :P
don't try explaining that to her tho..... just leave. lol
User avatar
niss720
Mine is bigger than yours
Posts: 277
Joined: Sun Apr 10, 2011 1:26 am
Location: Adelaide

Post by niss720 »

looks great! If you do put the mud flaps on take the rubber off of them, they look much better with out it!
Parting Blue JA Starion

Mercedes W126 420sel
Blue JA Starion (parting)
Silver JA Starion, 45000kms, coilovers
4G63 VR4 cordia
redzone
racking my brains
Posts: 5900
Joined: Thu Oct 06, 2005 10:46 pm
Location: sunshine coast qld
Contact:

Post by redzone »

DrDeath wrote:Yea. QLD rules are just getting worse
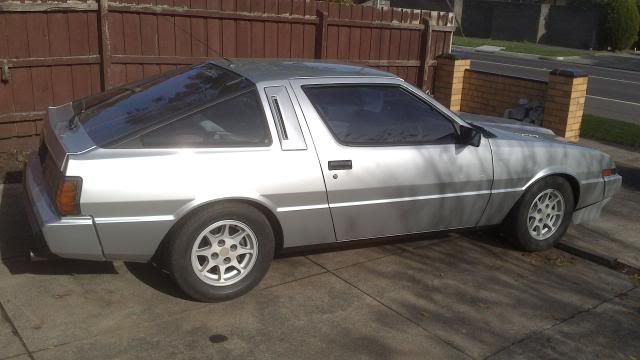
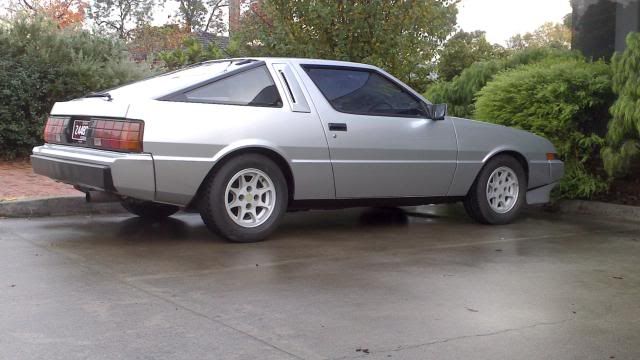
who told you that load of shit?
Fibreglass airdams $370, fibreglass front bumpers $260, reco drag links $165, alloy radiators $925 (unpolished), h/l switch rebuilds $125, all plus freight.
Coxs Automotive (07)54433507 3/5 Service st Maroochydore Q

www.facebook.com/coxsautomotive
www.coxsautomotive.com.au
Johnyturbo
Big Dorifto
Posts: 90
Joined: Fri Feb 12, 2010 2:39 pm
Location: Poland, Warsaw

Post by Johnyturbo »

Alspos wrote:First drive!! (with temporary permit) Boring clip but it was nice to finally drive it further than the end of the driveway. Inspection tomorrow....plates Monday I hope.

Image

Image
She looks great al!

Spent a good section of my evening reading at catching up on the work you have put in to it, the new paint has really come up a treat and going off this clip looks like shes running pretty good as well also, its come a long away from the car i remember seeing in your shed awhile back, it makes me home sick just watching this clip, not so much the streets of Melbourne but more the fact that i miss driving a very similar looking car :-)
User avatar
Alspos
Flucking kwankers
Posts: 4107
Joined: Thu Jan 08, 2004 2:09 pm
Location: Melbourne
Contact:

Post by Alspos »

Johnyturbo wrote: She looks great al!

Spent a good section of my evening reading at catching up on the work you have put in to it, the new paint has really come up a treat and going off this clip looks like shes running pretty good as well also, its come a long away from the car i remember seeing in your shed awhile back, it makes me home sick just watching this clip, not so much the streets of Melbourne but more the fact that i miss driving a very similar looking car :-)
Yes, it was a long time as a lawn ornament....and a shelf in the shed :D Much nicer now I can finally drive it a reasonable distance. It has taken a bit to get it to this stage though..nice it's finally (nearly) done.
User avatar
Alspos
Flucking kwankers
Posts: 4107
Joined: Thu Jan 08, 2004 2:09 pm
Location: Melbourne
Contact:

Post by Alspos »

And now...the answer to the question you didn't ask and probably wouldn't have even thought of.

My left mirror was hanging like a limp leaf, turn the up and down knob and nothing would happen, no adjustment whatsoever and would continually flop towards the ground. So...I decided not to buy another mirror but to rip mine to bits to see what was wrong and whether parts from a RHS mirror could be used to repair it.

First, mirror off car.
Then, peel back the rubber boot and undo the two screws that hold the mirror to the base. Then remove the rubber boot.

You get this.

Image

Then after a little while of coersing, you finish up with this...

There are two parts broken in this pic, the plastic part with the round and square hole should not be split and the silver pin is supposed to be embedded in the black threaded part above it.

Image

Now, to disassemble the RHS mirror and steal the parts I need to fix LHS mirror.
First, undo the black plastic nut and remove bracket from the base. Then pry off the circlip. Under it there is a washer and spring. Once these parts are removed you can remove the threaded plastic part from the shafts. This black plastic part was one that I needed to fix my mirror.

Image

Remove the circlip that should be on the end of the threaded shaft. Wind the shaft so the threaded block can be removed.

There are two long clips that hold the in/out mechanism in place. Use a punch and hammer on the tab on the inside of the clip. Once the tab is free, gently hammer the clip out of the base. Repeat for the other clip.

Image

Image

Image

Once the clips are out you can tap the shafts out of the base.
The black plastic part can then be tapped out from inside the base. This is the other part I need for the repair.

Image

Left and right hand base side by side.

Image

Then the reassembly is the reverse. I put the new bits from the RHS mirror into the LHS mirror.
Black plastic part is put in place first with a bit of grease.
Then the shafts are tapped back into the base. Make sure the cam and the hole in the black plastic part line up.
Then the long clips are knocked back into place.

Image

The threaded block is screwed back on. Replace the circlip on the end of the threaded shaft.

Image
Image

Black plastic sleeve is then placed on the base. It is keyed so you can't stuff it up. The silver pin slots into the black plastic part that was installed first.

Image

Re-install the spring, washer and the circlip. I used a tube spanner to push the circlip back on then tapped it home with hammer and a punch.

Image

Put the bracket back into the window mount and screw the plastic nut back on.

Image

Refit the rubber boot.

Image

Put the mirror screws back into place and tighten up

Image

Done!

Image

And back on the car. All works again. One more thing off the list.

Image
Last edited by Alspos on Fri Jun 14, 2013 7:42 pm, edited 1 time in total.
JDSTAZ45
almost postwhore
Posts: 1250
Joined: Sat Feb 12, 2005 10:00 pm
Location: Inner West, Sydney

Post by JDSTAZ45 »

Excellent write up on the manual mirrors. Nice work! They are so much lighter than the electric mirrors.
I wonder if you can incorporate the internals of the manual mirror and use on the Conquest housing??
The LHS is the problem case as it does not come across enough to view from the driving position on RHS drive cars, together with the wiring issue on JA's.

Also, get some decals on that freshly painted car. It looks almost naked :D Plenty on ebay!

:beer :beer
Imports.
88 GSR-VR Widebody 2.6L
87 GSR-V 12V Dash 2.0L
Post Reply

Who is online

Users browsing this forum: No registered users and 2 guests