Page 1 of 1
Paint questions
Posted: Tue Jul 11, 2006 3:51 pm
by Alspos
This is for future reference but here goes. I have a Staz. It needs the front half painted (bonnet, bumper, etc from the doors forward.) The panels are currently undercoat, red and silver.
Now for a dumbass like me who's only ever painted walls with a brush, what else do I need to know other than what's
here?
Sanding before and between coats? Straight, circular motion, block, just by hand?
What brands of primer, sealer, etc? I'd hate to buy a 10 litre drum and use 600 mls.
Does the paint really dry hard enough in half an hour that you can sand it?
How long until the paint in the gun goes off?
I wouldn't have a clue what pressure comes out of my compressor. I know it shoots nails from the nail gun and fires up every now and again to build pressure. Can you buy an inline regulator or something to set the pressure?
What gun, nozzle size? Are the elcheapo $70 ones on ebay ok for half a car?
I'm guessing the answers can be added in the how to paint post once suitably edited. I can go and buy a book and surf the web, but hey, perhaps somebody else here wants to have a bash at it and we can kill two birds with one stone.
Thanks
Posted: Tue Jul 11, 2006 5:25 pm
by JD_Stazza_Brendan
Buy a regualtor,, most already have a regualtor but you should be able to get one from just about anywhere...
Use an old panel or get a freebee from some random car at the dump or wreckers and have a go at painting it.
Posted: Tue Jul 11, 2006 5:56 pm
by hcca
Sand before coats if you have exceeded the flash time (which is probably around 4-5 minutes). You can put multiple coats on within this time, just wait for the solvents to flash off first (ie. it stops looking wet). And clean EVERYTHING with prep-wash before painting.
When sanding after painting, wait at least an hour first for it to harden up. You can sand sooner, but if it's too soft, it will rip the paint off. Basically, you're waiting for the solvents to evaporate which is what makes the paint hard. Note that your car will probably smell a lot for a couple of weeks as it takes quite a while for it all to evaporate.
Sand in straight lines - circular motion tends to cut too deeply. Hand sand, don't use a block as you will likely cut through the paint on corners and edges.
You won't need 10L of primer - if using an etch primer, you will probably only need half a litre - a little goes a long way (don't aim for full thick-coat coverage). Filler/surfacer - probably around 2L will be enough for those parts. 2L of colour and 2L of clear would probably also be enough.
Get heaps of thinners - a 20L drum of general purpose stuff costs SFA and can be used to clean the gun and apply primers and surfacers. Then buy at least one 4L tin of high-gloss thinner for the colour and clear coat. For what you are painting, 4L is probably enough.
Pressure on the compressor depends a bit on the gun - most guns these days are HVLP so you can drop the pressure right down - I use around 30-35psi. I really wouldn't use more than 40psi. Test it on a scrap panel first - if it looks powdery, turn the pressure down. If it runs or spits, turn it up a bit.
For guns, 2mm tip is all-round ok for acrylic paints. I haven't seen the cheapo ebay ones, but a Star HVLP gravity feed gun wouldn't cost significantly more than that ($100-150) and would be better than a no-name.
Posted: Tue Jul 11, 2006 6:01 pm
by hcca
Oh, and DON'T try and sand etch primer - it doesn't like it. As I mentioned, all you really need is a thin coat so it shouldn't require sanding anyway. Spray filler/surfacer over the primer and sand that back before applying colour.
I wouldn't leave paint sitting in the gun unused - it will probably clog the gun up. Most guns only fit half a litre anyway which would only be enough for one or maybe two coats on a bonnet.
When finished, rinse the gun out with thinners, then put some clean thinners in the gun and spray it through so it cleans out the nozzle. Clean any residues on the gun, especially around the nozzle and air jets on the front - if these clog up, you will get some funky things happening. Also the air hole on top of the paint pot is important to keep clean. Toothbrushes work well (don't use it to clean your teeth afterwards).
Posted: Fri Jul 14, 2006 7:49 pm
by insane_clown
Everyone has a diffent way. I would do what hcca said but with the sanding I would use a block cause you get even pressure, with hand you get uneven pressure while sanding. But with edges and corners I would use my hand and not the block for the reasons hcca said.
:beer
Posted: Mon May 28, 2007 3:34 pm
by oped
HCCA, im planning on respraying my car soon, and its going to be from bare metal (as when i went to touch up a few areas about 3 strokes with 800 sandpaper took it to bare metal, so there is almost no paint left on it)
Im guessing you painted your Staz and Im wondering approx how much is needed to do it all... I just have no idea.eg.
XXlitres of colour paint
XXlitres of thinner
XXlitres of high gloss thinner
etc etc.
Thanks
Posted: Mon May 28, 2007 3:42 pm
by hcca
It depends a bit on how much you're planning to paint - if it's just the exterior, you'll probably need around:
4L of primer/filler (you might only use half of it, but it's pretty cheap)
4L of colour
4L of clear coat
8-10L of gloss thinners (start with 8L and see how you go - it's around $25 for a 4L can)
I used about double that (actually about 10L of colour!), but that was the entire car including the engine bay and the whole interior.
If you're doing bare metal spraying, use an etch primer first - should only need 2L at most (spray it very thin).
I would also grab a 20L drum of general purpose thinners for use with the primer/filler and for cleaning your gun etc - costs around $60.
Posted: Mon May 28, 2007 3:45 pm
by oped
Oh also do you have any pics of the final outcome of your spray job
Posted: Mon May 28, 2007 4:11 pm
by hcca
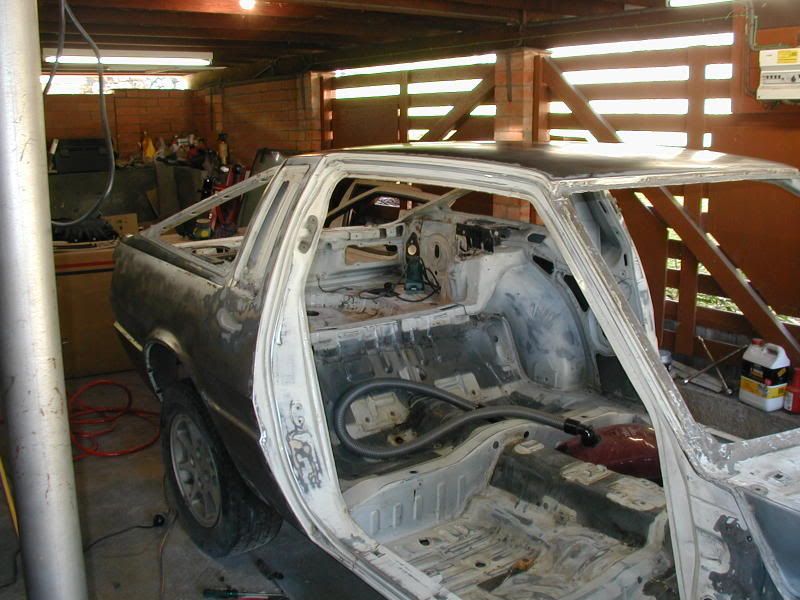
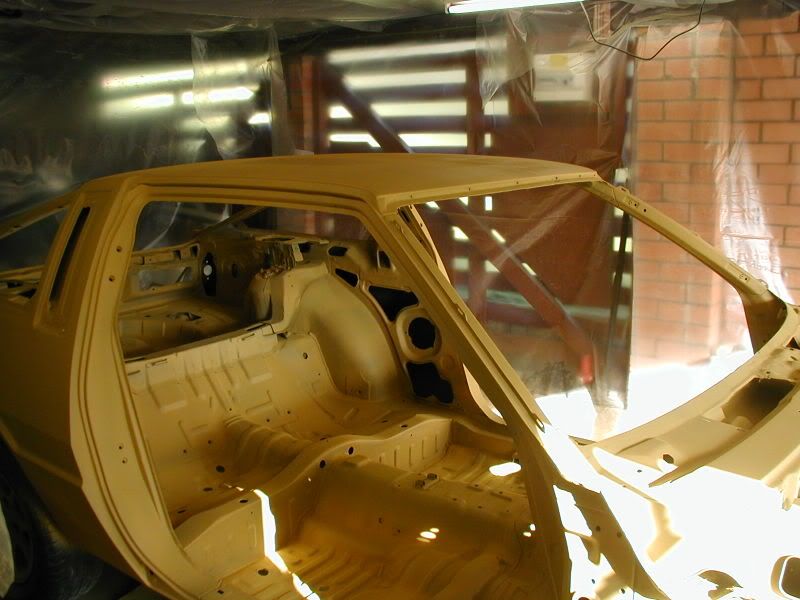
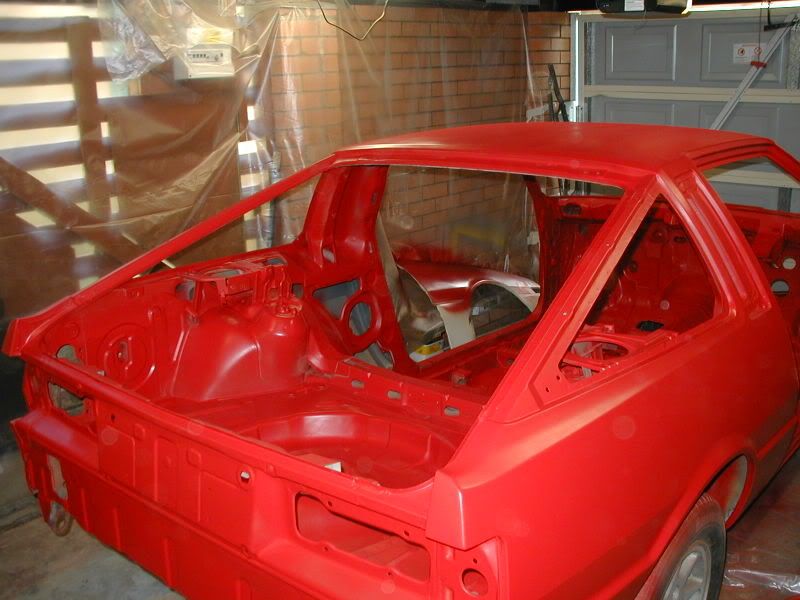
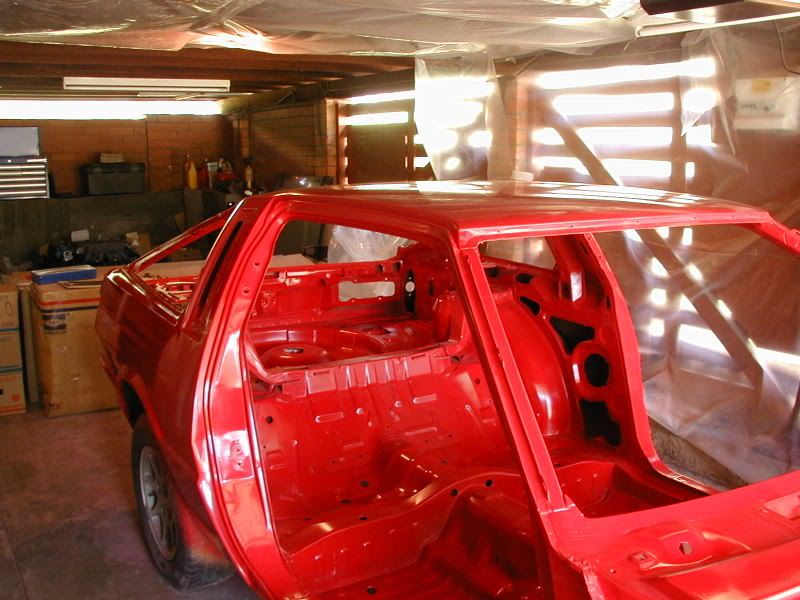
Old photo, but there's some glossy-looking bits here :)...

Car is currently under a thick layer of dust right now so I can't take any new photos - it's significantly more assembled now than in these pics!
Bare metal:
Primer:
Colour (this is straight off the gun - no sanding or anything :)):
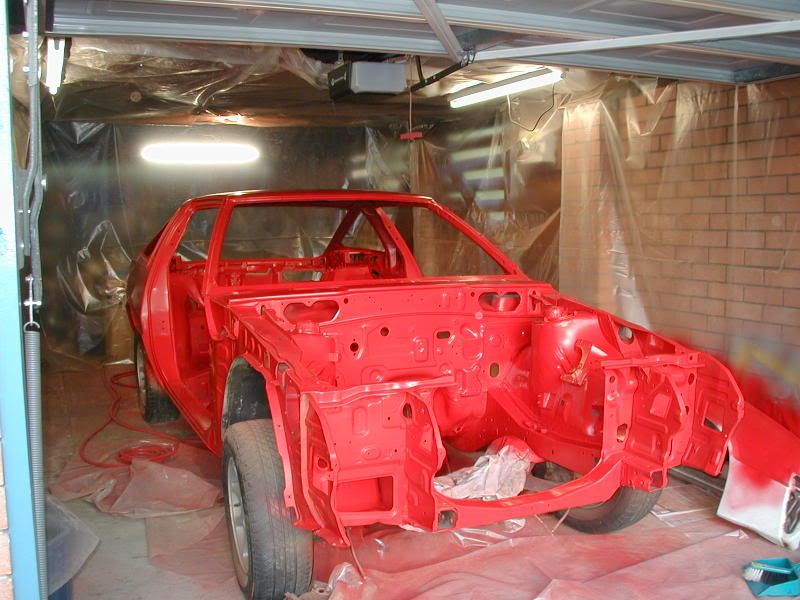
After clearcoat and sanding:
As I said to some people yesterday, there is going to be potential progress with this thing in the next few months! (hey, it's only been 7 years so far :)) I've also moved house about 4 times during all this..
My spray job is not perfect - there were some dents that I didn't see until after I had sprayed the colour and I was over trying to fix them by that point. It's still light years ahead of where it was when I bought it though.
Posted: Mon May 28, 2007 4:27 pm
by JD_Stazza_Brendan
so thats what a starion looks like naked
Posted: Mon May 28, 2007 8:35 pm
by oped
Thats quite impressive... Looks great... about how much did that set you back?
Posted: Tue May 29, 2007 8:49 am
by hcca
Paint-wise, it was probably around $5-600 - I also bought a decent compressor and spray gun though which added about $900 to that - still a pretty cheap job in the end :)
It's not perfect (the paint itself i'm really happy with, but there was some panel prep that I overlooked so there are a few dings and stuff still visible), but I wanted the entire car to be red (it used to be white) which would have cost substantially more to get a professional job - I even went so far as to remove all the tar sound deadener on the floor which is the worst job ever.
In the future I can get the panels resprayed without having to worry about the engine bay and interior.
Posted: Tue May 29, 2007 9:26 am
by TOMSUN
http://www.airless.com.au/Star%20Spray%20Guns.htm
Good prices on this website...
I just bought a Star mini (touch up) HVLP gun (for background when I airbrush)