Spray Painting Help **PICS ADDED HELP STILL NEEDED**

A place for general discussion. Catch up with mates, post pics, or if you just want to pick on e-thugs.
User avatar
madeofmilo
Enthusiast
Posts: 578
Joined: Fri May 21, 2004 5:53 pm
Location: Melb - East

Spray Painting Help **PICS ADDED HELP STILL NEEDED**

Post by madeofmilo »

Hey guys,
Here are some pics, don't laugh.


What the hell is going on?
Image
Image
Image
Image
cheers Dave

thanks hcca
Last edited by madeofmilo on Mon Jan 02, 2006 11:37 am, edited 1 time in total.
My JA has perfect motor - FMIC - forgies - high flow head but...rusted front guards and keyed on every panel. Time to get serious or time to take it to the tip.
User avatar
hcca
Enthusiast king
Posts: 884
Joined: Thu Jan 08, 2004 9:24 pm
Location: Brisbane
Contact:

Post by hcca »

Do alternate vertical and horizontal coats to stop tiger striping.

Also, if you're using acrylic, you might find it beneficial to give it a light sand (wet 800/1000 or so) before applying more coats.
User avatar
madeofmilo
Enthusiast
Posts: 578
Joined: Fri May 21, 2004 5:53 pm
Location: Melb - East

Post by madeofmilo »

ohh this is going to sound so dumb,

I was told to only go in one direction. If i go both ways it should be better.
Thanks hcca!
My JA has perfect motor - FMIC - forgies - high flow head but...rusted front guards and keyed on every panel. Time to get serious or time to take it to the tip.
StarionBoy
i need to paint my car!
Posts: 374
Joined: Fri Jan 09, 2004 9:42 pm
Location: Ballarat

Post by StarionBoy »

how have you sanded it back?? if you have just sanded one part down and not another part then obviously ur gonna see the line where the old paint is higher than the new paint.. try sanding the old paint (which ur over lapping) so it gradully gets thinner if u know what i mean..
really hard to describe in words on here lol
User avatar
chunkhead
Mmmmm, I love rice
Posts: 1198
Joined: Thu Sep 30, 2004 2:57 pm
Location: Melbourne

Post by chunkhead »

Really light coats, left to right and then right to left! Remember to start spraying from just off the panel, and stop just off the panel on the other side! Make sure your pressure isn't too high also!
Gone V8 Hunting: Be Back In Seconds!

For Sale:
Xbox/360/Wii Mods Now Available
User avatar
madeofmilo
Enthusiast
Posts: 578
Joined: Fri May 21, 2004 5:53 pm
Location: Melb - East

Post by madeofmilo »

hey guys, thanks for help. It still looks shit. Dunno what to do, my gun must or may be set incorrectly.

Cheers Dave
My JA has perfect motor - FMIC - forgies - high flow head but...rusted front guards and keyed on every panel. Time to get serious or time to take it to the tip.
User avatar
hcca
Enthusiast king
Posts: 884
Joined: Thu Jan 08, 2004 9:24 pm
Location: Brisbane
Contact:

Post by hcca »

What's wrong with it? Rough finish? Not shiny?

Did you sand off overspray between coats? (you can do multiple coats without sanding, but you should do them within 5 minutes of each other).
User avatar
madeofmilo
Enthusiast
Posts: 578
Joined: Fri May 21, 2004 5:53 pm
Location: Melb - East

Post by madeofmilo »

sanding eh? maybe I should post a picture. So you know what I'm on about.

cheers Dave
My JA has perfect motor - FMIC - forgies - high flow head but...rusted front guards and keyed on every panel. Time to get serious or time to take it to the tip.
User avatar
hcca
Enthusiast king
Posts: 884
Joined: Thu Jan 08, 2004 9:24 pm
Location: Brisbane
Contact:

Post by hcca »

sanding eh?
I take it from that you didn't :) If you spray over the top of overspray, it will make it rough. The paint has a flash time and a recoat time - flash time is around 5-6 minutes usually which means you can spray multiple coats 5-6 minutes apart. If you go over this time, you should wait until the recoat time before spraying again. Before recoating, sand back with 1000 wet to get rid of the overspray/rough finish areas - it should be smooth to touch.

The good news is, what you've done is probably fixable - try sanding it back now with 800/1000 (depending on how bad it is) wet. If you dry off the areas that you've sanded, you'll probably see a whole lot of tiny pits. Basically, keep sanding until all the pits are gone (try not to go through the paint though) - it will take ages :). Don't sand in a circular motion either. If you're going to clear coat it, do that now. If not, once all the pits are gone, go over it with a medium grade cutting compound, followed by the meguiar's 3 part polish system (paint cleaner/polish/wax) and it should come up nicely. If you DO clear coat it, the same procedure after clear coating will give you a nice finish too - yes, it means sanding all the pits out again!
User avatar
madeofmilo
Enthusiast
Posts: 578
Joined: Fri May 21, 2004 5:53 pm
Location: Melb - East

Post by madeofmilo »

hcca, thanks again for your help mate. Why couldn't you live in Melbourne?! I got a quote to do the 2 panels I wanted and it was $500 and I though fuck it, I can do this, and the paint was only $50 so even if I have to sand it right back and start again (I did prime) I'm still up a few hundred.

Please hcca tell me it's a skill and you do get better!
I figured I may as well learn to do it now so when I'm older I can do it no problem but dam it's hard!

Cheers Dave
My JA has perfect motor - FMIC - forgies - high flow head but...rusted front guards and keyed on every panel. Time to get serious or time to take it to the tip.
User avatar
greenstaz82
Mine is bigger than yours
Posts: 275
Joined: Tue Nov 09, 2004 8:29 pm
Location: brisbane

Post by greenstaz82 »

hey mate , is the finished job really rough ? , coming out of the gun like stone gaurd would ? lol , if so i think your not applying it wet enough or u havent thinned out the paint enough . A good mix for acrylic is 40/60 , 40 % paint 60% thinner , another way is to roughly guess your paint and thinner into the gun stir it up , pull the stick out and let the paint run off while counting to 7 , all the paint should be off the stick and dripping by 7 seconds. if the paint runs on after 7 seconds it is still to thick and if its dripping before 7 is is to thin . I hope that helps u out a bit , im not a painter but played around with spray guns and paint a bit before . good luck :beer
User avatar
hcca
Enthusiast king
Posts: 884
Joined: Thu Jan 08, 2004 9:24 pm
Location: Brisbane
Contact:

Post by hcca »

What's the weather like? If it's really hot, you're going to need a slower thinner (ie. won't evaporate as fast). Right now probably isn't the best time for painting :)

It looks from your pics like it's coming out too dry as greenstaz mentioned which could be either incorrect/not enough thinner or too much gun pressure.

Compressor should be set around 35-40psi (assuming you're using an HVLP gun).

It also looks like your surface prep might not be that good :).. I'm assuming that you didn't sand back to bare metal first so you probably don't need an etch primer, but did you use a primer/surfacer before the colour?

Also, I can still see a bit of striping - it may need another one or two light coats.

As it looks like it has a rough finish to it, try what I suggested with the wet and dry paper, polish etc. You'll be surprised :) Just do a small area first and sand it back until you can't see any pitting in it (you'll have to dry it off to see). Once that is done, polish it up and see how it looks.

EDIT: Just looking at your pics again - the bottom one suggests it's too thick - what mix of paint and thinner are you using? Should be about 3:5 ratio.

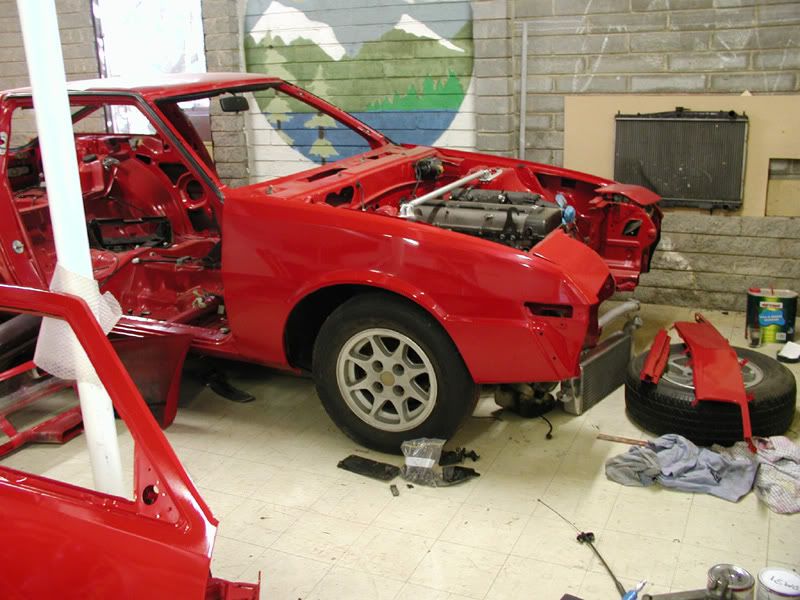
It's something that you've got to have a go of though - my first car sucked but I learnt from the numerous mistakes I made and the Starion turned out pretty well.. it's far from perfect, but it will do for now :)
Image
User avatar
madeofmilo
Enthusiast
Posts: 578
Joined: Fri May 21, 2004 5:53 pm
Location: Melb - East

Post by madeofmilo »

DUDE THANKS HCCA!!

I sanded back (using wet 1000) and cut (doing a thorough job) and polish using all good products. Then it came up amazing!
I was under the impression that after just painting it should look great. Turns out there is still heaps more to do.

I've got a panel I've just finished bogging, could you give me a list of the steps for painting - trough to finish.

i.e
1) prime
2) sand
3) mix paint with thinner (60% thinner 40% paint).
4) paint
5) sand (wet 1000)
6) paint other direction
7) sand (wet 1000)
8) repeat 4 - 7 a few times
9) cut (cutting compound)
10) polish
11) gloss?


did I miss something?

cheers Dave
My JA has perfect motor - FMIC - forgies - high flow head but...rusted front guards and keyed on every panel. Time to get serious or time to take it to the tip.
User avatar
madeofmilo
Enthusiast
Posts: 578
Joined: Fri May 21, 2004 5:53 pm
Location: Melb - East

Post by madeofmilo »

is it similar with metallic, which I'm using.

Cheers Dave

**also MODS could you cut and paste HCCA's last paste and make it a sticky on "how to paint" 'cost there is nothing out there about it **
My JA has perfect motor - FMIC - forgies - high flow head but...rusted front guards and keyed on every panel. Time to get serious or time to take it to the tip.
tmz_99
Harmful or fatal if swallowed
Posts: 1582
Joined: Fri Sep 26, 2003 1:50 am
Location: Perth
Contact:

Post by tmz_99 »

madeofmilo wrote: **also MODS could you cut and paste HCCA's last paste and make it a sticky on "how to paint" 'cost there is nothing out there about it **
Done, please find HCCA's last 2 posts in the body & interior mods section under their own topic sticky.
---------
TVR T350C
Post Reply

Who is online

Users browsing this forum: No registered users and 4 guests